Image Map

Friday, November 30, 2012

Homemade Laundry Detergent

I made this months ago but didn’t want to blog about it until I seen first what all the Pinterest fuss was about, lol. I had been seeing homemade tutorials like this forever but I’m always late on the bandwagon. It wasn’t until my banker that was helping us buy the house gave me a sample and the recipe that made me fall in love (I’m not sure where she got her source but I’m sharing it with you and there are plenty of Pinterest sources if you click the link above). Oh, and the smell “had me from hello!” Love that clean smell!

Ingredients:
1 (4 lb 12 oz) box of Borax
1 (3 lb 7 oz) box of Arm & Hammer Super Washing Soda
1 (3 lb) container of OxyClean
3 bars of Fels Naptha soap (or you can use Zote soap)
1 (4 lb) box of Arm & Hammer baking soda (or you can get two 2 lb boxes from the cooking section because our store was completely out of the bigger boxes in the laundry section)
1 bottle of Purex Crystals
(next time I definitely think I want to add another bottle of this magical smelly good stuff)

You mix the Borax, Super Washing Soda, OxyClean, and baking soda together. This was tricky because I had just bought a Rubbermaid container, one of the smaller ones, and it was hard mixing everything together in that. So I highly recommend doing this all in a bucket or tub, then adding it to your storage container of choice. I added the Purex Crystals. Now comes the aggravating part, lol. You have to grate the cheese soap. It only took about 15-20 minutes to grate but it was the most time consuming step. You pour the soap in and mix everything really well and VOILA, you have enough laundry detergent to last a year (so my banker says =) You do not have to use much at all so I believe it will last a year. I only use about 2 tbsp. and it works great. It even does well with my cold water washes.

Homemade laundry detergent

Homemade laundry detergent3

Happy washing! Because I know I’ll not only be starting to move into the new house this week but I’ll be washing too, lol.

Tuesday, November 27, 2012

Kenna’s room finally started

Well, we’re getting closer and closer to moving into our new house. We’re going to start officially moving stuff in this weekend so in the meantime, I’m packing AND I’ve went over to start painting Kenna’s room! Remember my inspiration and mood board?

image
(Inspiration source)

image

The more and more I thought about a pink room, the less I was gung-ho about it. Clara’s room in my inspiration board up top looks lighter and just pretty-in-pink but my mood board looks more mauve. I am not a fan of mauve =/ Buuut, I went ahead and bought Olympic ONE paint + primer and had it color matched to Benjamin Moore’s Proposal. The cool thing about Lowe’s is even though my store doesn’t sell BM paints, they have the color’s in their computer =)

So now a few before and afters of a pre-teen’s room being transformed SLOWLY to a toddler’s room.

Kennas room before

Those corner shelves? Yeah, there’s a set in two of the corners and there’s also shelves lying on that bed that I pulled off the walls. I‘m going to keep the straight shelves, paint them white and maybe rehang in a group but the corner shelves I want to take out. They were screwed in with wood screws and VERY sturdy and I didn’t have any tools with me. Taking those out means filling holes and repainting too. Sigh.

Kennas room before2

Kennas room before3

Oh, and the bed was left for us but we’re gifting it to my niece who needs a big girl bed =) See where there’s paint missing in some spots like above the window? The pre-teen, who’s also my husband’s cousin, had mirrored peace signs around the room. Oh, I remember those days but I didn’t have a cool room like this!

Kennas room during

Kennas room during2

And that door knob and the light switch/outlet plates need to be switched out. So there’s a few things that need to be done but it’s on it’s way and I am very excited.

More after pictures soon!

Tuesday, November 20, 2012

Ruffled tank top

I’ve been wanting one of those cute ruffled tank tops that everyone seems to have. Something kind of like this…

(source)
But more like Tea Rose Home’s tank…

So I got a wild hair last week and just started cutting up a white t-shirt because I knew I envisioned a cute shirt under a cardigan for our Christmas pictures. It was definitely trial-and-error since I didn’t use a tutorial but just started cutting 2 1/2” strips from a white shirt and pinning it to an old white tank top I had lying around. Here’s some horrible iPhone pictures, lol.
Here’s my old tank (please ignore my very messy unfinished craft shed =)
IMG_0516
T-shirt.
IMG_0517
I started cutting my shirt into very blurry strips.
IMG_0518
I eyeballed my starting position and started pinning away.
IMG_0519
Here’s where I had a hiccup!
IMG_0520
My starting point should have been the top of my shirt so it would go all the way across and not break up the shirt any. See what I mean? So I ended up taking those first two short pieces out and replaced it with a long piece and turned the extra in and sewed around the neckline.
IMG_05200
Here’s my finished work. I also want to note that when I put this on the ruffles on the top were puckering up. You could probably avoid this by making longer strips width-wise. Because I was desperate, I just used hem tape and ironed down the 5-6 ruffles to make sure they did not curl up to reveal my tank top underneath.
IMG_0531
And I did wear it for our Christmas pictures along with my Vintage Rose Wrap belt and Kenna’s headband =) This photo shoot is the fourth shoot we’ve done with Melody Coarsey Photography and we love her =)
image
And I snapped this picture this morning to show off my tank top once more =)
IMG_0567
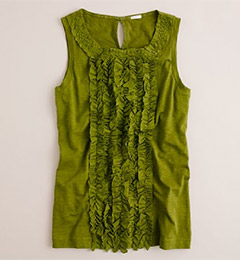
Now I want to try to make this pretty thing! I love the color! Couldn’t find the original link but it’s from J. Crew.

(source)
Once again, everyone have a great Thanksgiving! We’ll be headed downstate to see my granny and dad and I can’t wait =)

Linked up at: